Area of Application
GrafiWrap Wall Deco film (monomeric, polymeric & cast) have been designed especially for application on difficult surfaces (painted walls, brick walls, stone, concrete, etc…).
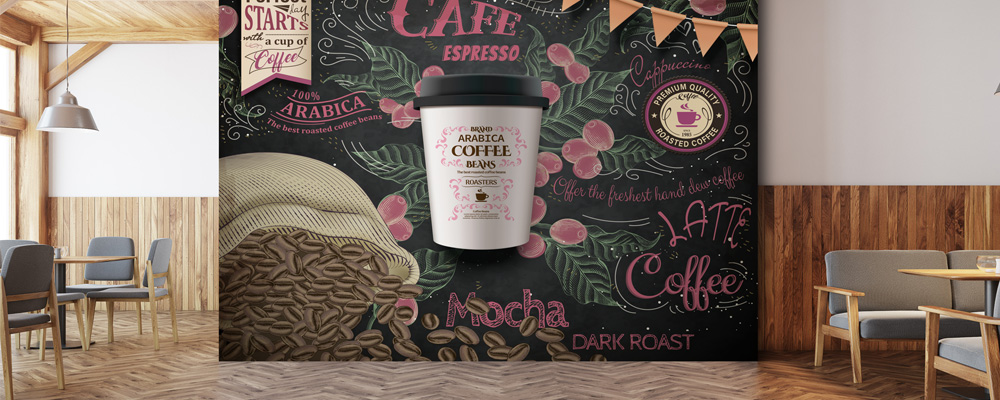
Monomeric GrafiWrap Wall Deco films are recommended for a variety of indoor surfaces, such as plastered walls, lacquered walls, plasterboards, etc… They are perfectly suited for short term promotional campaigns in shop interiors.
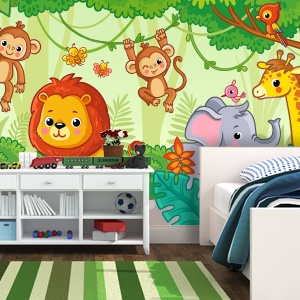
Structured (LINO and SMERIGLIO) polymeric GrafiWrap Wall Deco films have been designed for interior decoration on rough surfaces, such as plastered walls, plasterboards and partition walls.
Cast GrafiWrap Wall Deco films are meant for indoor and outdoor application on the most difficult surfaces (painted walls, brick walls, stones, concrete, etc… The films come with strong solvent-based acrylic glue and easily conform to 3D surfaces.
GrafiWrap Wall Deco films are printable with eco/mild/hard solvent, latex and UV-curable inks.
Creating Your Print
You start by creating your print on either a solvent (eco/mild/hard), latex or UV printer. Structured polymeric GrafiWrap Wall Deco films (LINO and SMERIGLIO) require high amounts of ink with a high saturation of colours.
Prior to application or lamination, your print must be completely dry. Solvents in the ink may have a negative effect on the film’s adhesion properties. In general, a drying time of at least 24 hours (for solvent inks) is required. Depending on the amount of ink sprayed on the material and/or environmental conditions, the material may need up to 72 hours to dry sufficiently.
While drying, the material should not be tightly wound on a core, as solvents cannot evaporate in this case. The material is preferably left to dry loosely wound on a core. The sheet material is preferably placed on a rack.
Preparation of the Surface
Grafiprint Wall Decoration films have to be applied in the best possible way, to ensure that the product will perform well.
Ideally, GrafiWrap Deco Films are applied directly onto a dry and untreated painted or lacquered wall, plasterboard, stone, brick wall, …. However, you always need to make sure the surface is perfectly cleaned before you start the application.
Remove dust by means of a brush or blow it clean with compressed air. If the wall is covered with oil, dirt or salt, use a degreasing agent to wash it thoroughly. Afterwards, allow at least 48 hours for the wall to dry, before you start the application.
If the wall is not completely dry when the film is applied, this may lead to premature failure of the graphic.
The humidity within a wall is not “visible”. If you want to be sure that the wall has sufficiently dried, you can do a test by means of a moisture meter, which can be bought at any DIY-shop or through the internet. The brick wall should contain a maximum of 10% of moisture to ensure a good adhesion in the long run.
Some older walls have a very high level of porosity, so that water may easily infiltrate. In case there is moisture in between the wall and the film, the adhesive layer cannot build up its normal strength and will come loose from the surface. Therefore, we advise you to always do a test with a small piece of the film first, before you cover a complete wall.
Good results have been achieved on painted walls as well. Some paints, however, may contain high levels of plasticizer (e.g. matt emulsion paints). Surface adhesion will be much lower on this type of (matt) finish. Adhesion levels may also vary from colour to colour and from paint brand to paint brand. Other paints may contain (in)organic silicon components,
meant to repel dust particles. These components in the paint may also lead to much lower surface adhesion.
Painted walls also need to be completely dry and hardened before you start the application. At room temperature, paint needs at least 5 days of drying time before you can apply a graphic onto it. Solvent residues in the paint can influence the adhesive strength of the film and cause excessive shrinkage and/or blistering. Please note that some paints can take months to fully cure.
Matt paints have a non-reflective surface with a rather porous texture. This porous texture makes the application of self-adhesive films much more difficult due to the inability to adhere to the surface. As a result, the film will stick less hard to the painted surface, which may lead to premature failure of the graphic. Satin paints are more lustrous than matt paints, though they do still contain matting agents, which can negatively affect the ultimate adhesion of the material. Semi-gloss paints have a smooth and shiny finish, which is ideal for the application of self-adhesive materials. Glossy paints are even more smooth and shiny and in the end are suited the best for the application of self-adhesive materials.
Application on latex paints is not advisable. High tack adhesives may work on smooth latex paints, but thorough testing is required.
Damaged surfaces can also influence the level of adhesion.
NOTE:
Some surfaces may need processing and/or curing before the application of self-adhesive products. It is the end-user and/or applicator’s responsibility to test and ensure that substrates are suited for Grafiprint wall decoration films and whether or not they need further processing and/or curing.
Always test adhesion and paint/adhesive compatibility. Adhesion can be tested by
applying a small strip of film on the surface and allow it to dwell for a couple of days.

Application
The following tools are needed to apply Grafiprint wall decoration films :
- Surface temperature thermometer and moisture meter (for checking surface/
ambient temperature and humidity)
- Lint-free cleaning cloths (for cleaning the substrate)
- Masking tape, marking pencil and tape measure (for positioning)
- Squeegee, heat gun and semi-hard roller (for applying the material)
- Rivet brush and air release tool (for working film into textured surfaces and
removing air bubbles)
- Razor knife (for trimming away excess material)
Temperature plays an important role in how well the material sticks to the substrate. Always follow the instructions with regard to minimum/maximum application temperatures, as mentioned on the technical datasheets. Higher temperatures will make the material softer and more pliable – the adhesive will become more aggressive. Lower temperatures will make the film more rigid and reduce the initial tack of the adhesive.
Before you start applying the material, always make sure it is suited for the intended application.
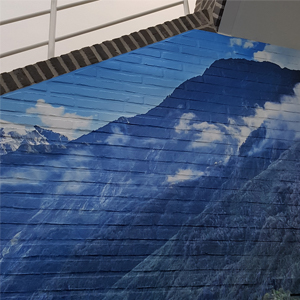
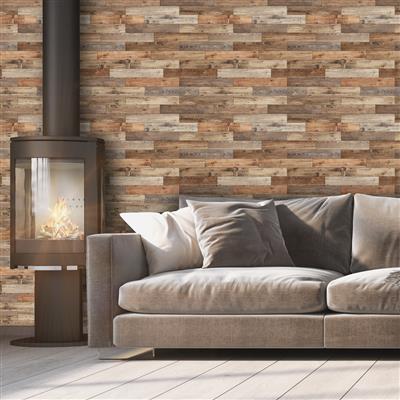
S838HT Wall Deco film on a brick wall
- Lay the material flat in the area in which you are going to apply it (at least a couple of hours in advance), allowing it to adjust to the ambient conditions.
- Start by lining up the graphic on the wall. Then remove a part (the upper part) of the release liner, and apply the film onto the rough wall by means of a soft felt squeegee, or press the film slightly with a glove (the kind that is normally used for vehicle wrapping). Don’t use too much pressure at this point, to avoid tearing the film.
- Check the position of the film on the wall. If you are satisfied with it, remove the rest of the release liner, and apply the bottom part as you did the upper part.
- Heat the film from left to right by means of a heat gun (temperature >450°C).
- Roll over the film firmly with a semi-hard roller. The structure of the brick wall will now become visible through the film.
- If necessary, remove air bubbles by means of a pin, re-heat the film and press out the air.
- After the film has been applied onto the brick wall, re-heat it once again to make sure it bonds well with the surface.
Special attention should be paid to the mortar layers between the bricks and to the areas where two layers of film overlap. These areas require more heat.
- The overlap between two strokes of vinyl should be 10 to 15mm.
If the film is applied onto surfaces, where a lot of water can get in between the film and the wall, we advise you to seal the edges by means of transparent sanitary silicone.
P230HT/P231HT/P232HT on rough surfaces, such as plastered walls, plasterboards and partition walls.
- Lay the material flat in the area in which you are going to apply it (at least a couple
of hours in advance), allowing it to adjust to the ambient conditions.
- Start by lining up the graphic on the wall. Then remove a part (the upper part) of
the release liner, and apply the film onto the rough wall by means of a soft felt squeegee, or press the film slightly with a glove (the kind that is normally used for
vehicle wrapping). Don’t use too much pressure at this point, to avoid tearing the film.
- Check the position of the film on the wall. If you are satisfied with it, remove the rest of the release liner, and apply the bottom part as you did the upper part.
- Roll over the film firmly with a semi-hard roller or a well-protected squeegee. Take care not to damage the ink, the print is not laminated.
- The overlap between two strokes of vinyl should be 10 to 15mm.
Other wall deco films on rough flat surfaces:
- Lay the material flat in the area in which you are going to apply it (at least a couple
of hours in advance), allowing it to adjust to the ambient conditions.
- Start by lining up the graphic on the wall. Then remove a part (the upper part) of the release liner, and apply the film onto the rough wall by means of a soft felt squeegee, or press the film slightly with a glove (the kind that is normally used for vehicle wrapping). Don’t use too much pressure at this point, to avoid tearing the film.
- Check the position of the film on the wall. If you are satisfied with it, remove the rest of the release liner, and apply the bottom part as you did the upper part.
- Roll over the film firmly with a semi-hard roller or a well-protected squeegee.
- The overlap between two strokes of vinyl should be 10 to 15mm.
The Removal
GrafiWrap Wall Deco films with removable adhesive can be removed with ease. Films with high tack adhesive require reheating and pulling off in small sections (The function of outside temperature and type of surface).
Grafityp Selfadhesive Products do not warrant damage to the interior wall surface caused by removing the material, even if a material with removable adhesive was used. Removing the material can always cause damage to the wall, especially if a material with high tack glue has been used. High tack adhesives have been designed to provide optimum adhesion on a
variety of substrates, so it is normal that they are harder to remove.
For best result, remove the material slowly. Start at the top of the graphic and pull it away from the wall at a 120-180 degree angle. Do not use any chemicals to remove the material. Heat may be used on all substrates, except for wallboards